Photography and Art

Tuesday, January 19, 2010

Magic Realism and Photography

I can't help it. I grew up in the sixties and seventies and my taste in art was a product of my exposure to record album covers, posters for rock concerts and Canadian artists that were popular at the time. My favourite artists of that era were (and still are) Ken Danby and Alex Colville, two famous Canadian artists who painted in the magic realism style.

Magic realism is a style of artistic expression that exhibits traits like photo-realistic detail, the merging of the fantastic with the ordinary and the depiction of the ordinary in great detail so that the emotion under the surface is exposed. Here's a very nice website that describes magic realism in more detail with lots of nice examples.

I've been fortunate to have visited many of the great galleries of the world and have gained a deep appreciation of many artists and painting schools, but I still would love to have a Colville or a Danby original hanging on my wall more than anything else.

So, you might ask, what has this got to do with photography? Isn't photography by its very nature realism? Well, realism is not magic realism and I think you can create art that can be called magic realism with a camera and Photoshop. Here's one example:

This image, entitled "Last stop, everyone off", was taken in December and achieves the kind of magic realist look that I've recently been striving for. The subject is surreal -- what's an old trolley car doing in the middle of the woods? The woods themselves are captured in super detail. I've used a small aperture to get a large, unnatural depth of field so that the trees in the foreground and the trees in the background are sharp. I've also used the sharpening tools in Photoshop to crisp the image up just a little beyond reality. The saturation and local contrast have been adjusted to go just a little bit over the edge as well so that the image will not be mistaken for a photograph. The overall mood of the photo is just a little sad. What is the story of the trolley car? Why did it get abandoned in the deep woods?

Here's another image that comes close to what I'm trying to achieve...


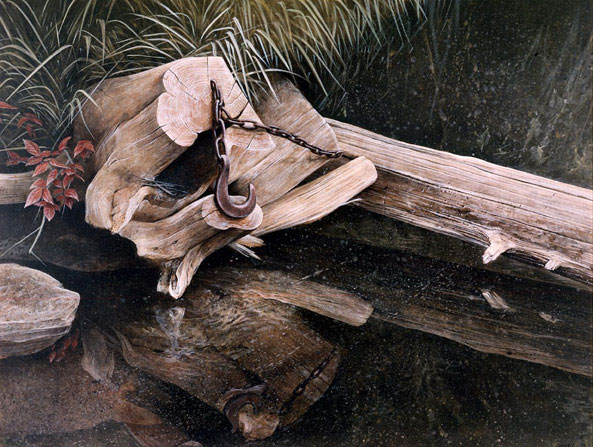
The title of the image is "Sunrise, Sunny Lake" and it has several qualities of magic realism that I quite like. Again, I've used local contrast enhancement and saturation to make it look more like a painting and less like a photo. The sharpening was also taken up a subtle notch to emphasize the lines of the paddle boat. This time, instead of choosing a subject that was unexpected and out of context, the focus of the image is a mundane paddle boat. The use of rather commonplace subject focuses the viewer on the mood of the piece and the meaning that lies beyond the objects in the image. We see the potential of the day - the sun coming up, the paddle boat waiting for the children to use it and we also see the tranquility and beauty of the surroundings knowing that most people are in bed and not around to witness the subtle colours in the water and the shadows of the shore.

It's sometimes difficult to explain to viewers why your work is clearly not photographic in nature even though it comes from a digital camera. The purists among us would be critical of the over-saturation and over-sharpening. In fact, one person recently suggested that I take some Photoshop lessons because I clearly didn't understand how to hold back on the saturation slider not realizing that I'd fully intended to create a work that was meant to transcend photography. The purist would argue that photographs are supposed to come out of the camera fully hatched and perfect.

For the benefit of the purists, I recommend this video on Ansel Adams, probably the most famous landscape photographer who ever lived. Be sure to pay attention when Ansel's son shows the difference between the negative of one of Adams' most famous images and the actual print. The sky has been darkened from a mid-gray to black in order to emphasize the contrast between the sky and the land below.

As Ansel was fond of saying, the negative is the musical score and the print is the performance. This is especially true in the digital age. The digital negative (i.e. the file produced by the camera) is a flat, fuzzy thing that is just the raw material. Photoshop and Lightroom are the tools of the artist to create an expression that reflects what the artist saw through the lens with his heart.

Wednesday, January 13, 2010

Printing on Metal Part I

The Toronto Contact Photo Festival is coming up on May 6th and I'm getting quite excited about it. Contact is the largest photography festival in the world and runs for the month of May. Normally, I'm just a spectator, but this year I'm going to be a participant. Three of my works have been selected for an exhibition in the Elaine Fleck Gallery. Elaine and I had a meeting last week to review some of my recent work and we picked two images from my Intimate Portraits project, a series of close-ups of the large laker ships that winter in the Toronto harbour. The third image was taken very recently in the snowy wilderness of Haliburton and features an old trolley car abandoned in the woods.

I've been reading about printing on metal recently. I discovered this concept on Scott Kelby's blog where he was really enthusiastic about metal as a medium for fine art photography. As I thought about displaying my work for Contact in a way that would stand out from the thousands of other images on display, I thought about printing on metal. The subject matter of the three images is a metal object, so it seemed sensible to represent the subject matter on a similar material.

When I searched around for a photo lab to print my work, I found three that consistently came up in Google: Bay Photo Labs, ImageWizards and MarcorMedia.


Before I went shopping, I decided to do a little research on printing on metal and came upon three basic methods:

Inkjet Printing on Coated Aluminum
There are companies out there that make a coating for aluminum that is suitable for pigment inks. One such company is Inkaid. It sounds very simple: stir, brush on, air dry, print. They supply videos of artists applying Inkaid to a variety of media including cloth and metal. To print on metal in this scenario, you use thin aluminum sheeting that will fit through the rollers in a normal Epson printer. First, you scrub off the anti-corrosion coating that comes on the metal in the first place. You'll need an orbital sander for that, followed by Mr. Clean scouring pads. Second, you coat the metal with the Inkaid and finally, you put the metal through the printer. You obviously must have a printer that has a straight-through paper path - the aluminum won't feed from the sheet feeder. You mount the aluminum on to a carrier sheet so that the printer has something to grip and away you go. There's an excellent video from Bonnie Lhotka showing how you print on aluminum flashing using a coating from DASS. This looks very interesting as a do-it-yourself technique and someday when I have a lot of time, I'll try it and report back.

MarcorMedia, the Toronto service bureau I mentioned above, showed me some prints that were made using this technique when I dropped in for a visit last week. There were a couple of issues that I picked up on: first, there is no white ink, so when you blow out the highlights on an image, the colour that shows through is a very brilliant silver. They showed me a picture of a horse where a white splash on the horse's forehead was very, very bright indeed. I didn't like this effect - it reminded me of bar mirrors with beer logos on them. The second issue was the thickness of the aluminum. It didn't seem all that substantial - certainly not in keeping with the hulls of lake freighters.

UV Ink Printers
Little did I know, but there is a large business out there in printing things on metal for outdoor use. Think of the number of metal signs out there and you'll quickly see that this is a large market. There are purpose-built, flatbed inkjet printers that print directly on large sheets of metal using special inks that cure when exposed to UV radiation for a split-second. This process is well-suited to large print runs because the ink dries so quickly. Commercial printers like the process because the inks are very environmentally friendly. They don't give off harsh, flammable gases when they dry, so printers don't have to make a large investment in exhaust fans. However, these puppies are very expensive - expect to pay $100K plus for one of these printers. There is a site dedicated to large format printers called wide-format-printers.net and they have a good article on UV printers. Some of these printers actually use white inks, so the aluminum medium doesn't show through.

MarcorMedia showed me a metal print that was done on a Roland UV printer. It was a sepia-toned print of tall ships in the Toronto harbour and it had the look of an old-fashioned daguerreoptype about it. There were blown-out highlights in the clouds, but the metal underneath didn't overwhelm the print and was very effective.

Dye Sublimation Printing
The last category of printing has been used for a long time to produce things like photos on T-shirts and mugs. The idea is to use a special kind of dye ink that can be heated rapidly to form a gas (hence sublimation). The gas permeates the desired media and the image is infused into the medium. To print on metal, you first coat the metal with a resin of some sort. Then, you print a reverse image onto paper using these dye sublimation inks. Once the image on paper is dry, you mount the image onto the metal and put the two pieces into a heat press. Once the heat is applied, the dye forms a gas and infuses the plastic polymer coating on the metal.

One of the advantages of this method is the robustness of the surface. The ink goes deep into the polymer coating, so you can clean off the surface with a cloth. Another advantage of the process is the ability to print onto metal of any thickness, so you can transfer an image to a big chunk of iron if you want to. There is also no impediment to doing large works of art with this approach.

There are disadvantages. As with all dye-based inks, the artwork is subject to fading in direct light. It is also critical (and difficult) to get a completely smooth polymer coating. On a large work, it is not uncommon to get trapped dust particles in the polymer.

The Challenge
Both Bay Photo and ImageWizards seem to use variations on the dye sublimation technique. I asked their customer service folks and both confirmed that their methods are based on dye sublimation although they both stressed that they had developed certain proprietary improvements to the process. The owner of ImageWizards, Roger K Laudy, is reputed to be a genius in developing new printing techniques and has at least one patent to his name. Certainly, Scott Kelby was very impressed with the prints produced by ImageWizards.

I've now sent away for samples from both companies. ImageWizards sends out free samples (plus shipping) of photos on metal. Bay Photo charges you $22 for three 6x4 images on their various surfaces. With Bay Photo, you get to upload your own image. With ImageWizards, you get their own stock photo.

I'll probably get the metal photos back in a week or two and, when I do, I'll tell all. Stay tuned...

Monday, January 4, 2010

Photo Books

I've been publishing photo books lately and have had some positive experiences that I'd like to describe. I was working on two projects: a high quality art book that features my Road North portfolio, a set of images taken in the countryside that runs from Toronto up to cottage country, and a family snapshot album with pix of our kids and grandkids taken in 2009.

These are very different projects with very different success criteria. For the Road North project, I was looking at a photo book printer that caters to professional photographers. Price was secondary to quality. If I'm fortunate and someone wants to buy a copy of the book, it needed to be convenient to order copies from the printer and have them shipped to my customer.

The family album was going to be printed six times and quality was secondary to price. I also needed something local here in Canada because Christmas was coming and I didn't need to be fighting with the border.

After much searching around, I settled on SharedInk for my Road North album.. They offer a couple of premium photographer programs that are available for a one-time (not annual) fee. The $99 basic option gives you access to book formats that are not available on the free service and give you the ability to upload and store 250MB of data. The premium option costs $199 and offers 1 GB of storage and some other goodies as well. You can see the two options here.

SharedInk offers Photoshop templates that are very easy to use. You create one Photoshop file per page and adhere to a page naming convention. When you upload your pages, SharedInk sorts them following the naming convention and presents you with a soft preview of your book. There are several binding options and some nice size offerings including 8"x8", 12"x12", 12"x16" and 8.5"x11". I picked the linen 12" square book and it cost me $70 for the first 20 pages and $2.50 per page for the next 4 pages. You can also get the same sizes in leather binding or clear binding.

I found the documentation to be outstanding and I really liked the control that I had over the final product by using Photoshop and templates to create the pages.

And, the proof was in the pudding. My book was absolutely stunning in quality. I compared the images in the book to images that I'd printed out on my Epson 4880 and the color looked quite accurate - no shifts in white balance. The gamut was also very nearly as good. The paper was thick and consistent with what you'd expect out of an expensive coffee table book.

Why does SharedInk charge for their photographer program? Here's what they say in their FAQ's:

"With the Photographer Program, we've found that the books created by photographers are much more demanding than our retail customers. Full-bleed printing, heavily saturated pages, and complex color models have all made the photographer books much more time-consuming and challenging to produce. For example, heavily saturated pages require more ink coverage and require us to clean the press more frequently.

"As part of the Photographer Program, we have implemented additional quality checks in our manufacturing process to ensure that the finished products meet the much higher standards of professional photographers. For example, as a direct consequence of servicing photographers, our process now includes a thorough quality check, under a lamp, by a second set of eyes after the sheets are printed. This means that each printed page is inspected twice, by two different people. "

I'd have to agree that the additional quality checks certainly work. There is also a 100% satisfaction guarantee that is very reassuring.

SharedInk is highly recommended and I'm going to join the $99 basic program.

For the family album, I shopped around and decided on Photobook Canada. I liked the pricing (in Canadian dollars too!) and liked it that I could save shipping if I picked my books up. They are located in Richmond Hill, so anyone in Toronto can save the shipping costs too.

Photobook has a downloadable application that makes it really simple to create a book. You drag and drop your photos into templates and can choose from a bunch of album styles. Of course, you lose control over the sizing of your pix, but this isn't aimed at the pro shooter.

I chose an 8"x8" soft cover book for my family album and the cost came to $40 CDN for 40 pages. There are lots of other sizes and cover options to choose from.

The album was not in the same class as the one produced by SharedInk. The stock was thinner and the color controls were not as good. There was a subtle reddish cast to some of the pages, but not to others. Good enough for a family album, but not good enough for professional use. The price was right, especially for people who reside in Toronto and can pick the books up.

Photobook Canada does have a pro option where you can publish a kit with swatches of cover cloth. This is aimed at the wedding photographer. There is also a pro version of the album layout software that seems to give more control over the image, but I didn't try it out.

Different horses for different courses, but both very good at what they do.

Technical Notes:

Both SharedInk and Photobook use the same press, the HP/Indigo 5000. The press uses a four color ink process.