Photography and Art

Monday, July 16, 2007

My Art Show

Sometimes fortune smiles at you and good things happen. Over the week-end, an art show opened up in the village of Blue Mountain (near Collingwood) featuring local artists and I'm one of 'em!

Each artist gets to hang their art in a window in the village. My window had six images, each 16x24. The images are from my "The Road North" series that looks at things that you might see out your car window on the way to the cottage or the ski hill. There are three winter landscapes and three summer landscapes.

Here are photos of the exhibit:


And, here are the photos in the exhibit. There are three winter scenes (Tractor Show June 3rd, the green house and the white house) and three summer scenes (Phonehenge, Lunar Gravity and See No Evil, Hear No Evil, Speak No Evil):


Thursday, June 21, 2007

Phonehenge

Interesting photos often come out of nowhere. I've been working on a series of images called "The Road North". My main interest is to photograph the ebb and flow of life - capturing the wave-like nature of our existence. In Canada, we have this strange habit of disappearing into the country to the north of us each and every week-end to ski, camp, canoe or cottage (yes, in Canada, to cottage is a verb). Motorists jam the highway on Friday night and Sunday night, up and down the road in a weekly migration. They are intent on their destination and often don't notice the odd things by the side of the road. But, I do.

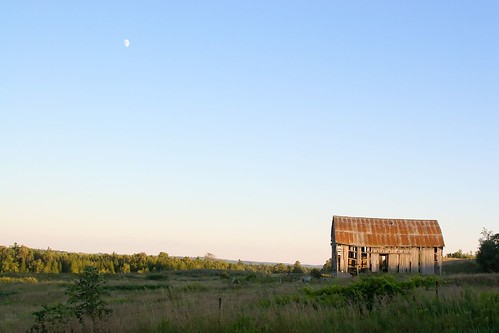
It might be a particularly funky barn tumbling down despite the efforts of the farmer. Or, perhaps a white house on white snow. Or, a sloping barn roof pointing at the moon. Or, an old tour boat sitting on someone's lawn. Each of these images tells a story that begs to be captured.

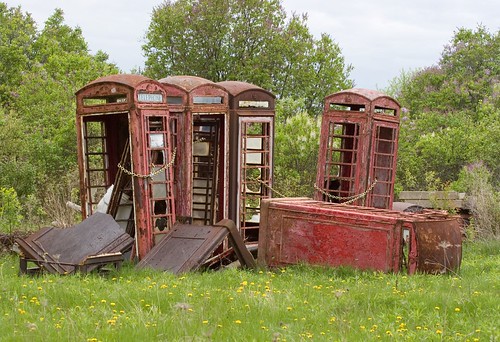
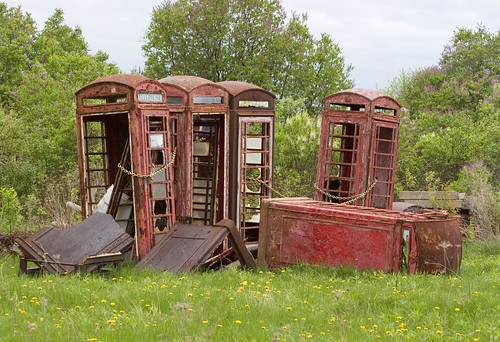
One day, I was driving along a country road on my way home from the cottage and I happened to spot something very odd out of the corner of my eye. I parked the car and walked into a farmer's field and found this image:


It looked like someone had started to buy up old Brit phone booths (now a protected species in the UK) with a view to fixing them up and selling them as decorations. A neighour in our area has one half way down his driveway. For some reason, the project looks to have been abandoned.

I was struck by the beauty of the rusty phone booths, the mystery of their presence in a farmer's field in Canada and their resemblence to Stonehenge. Who knows, an archeologist might stumble on these in the future and speculate that they were arranged in a circle for religious reasons.

Hence the title of the work: Phonehenge.


Tuesday, May 8, 2007

Photos of Animals

I enjoy photographing animals, mostly because I've been surrounded with pet dogs and cats since childhood and also because of the lure of capturing images of wild animals in their natural habitat. This must be a carry-over from my hunter ancestors because I really do enjoy stalking my prey and snapping photographs. I can bring home my "kill" on a compact flash card and display my trophies as photos, either on my wall or online.

My friend Mary Taylor recently returned from a holiday in Africa where she participated in a safari and captured some pretty nifty images. I'm jealous as hell. In comparison, I can only claim success in hunting down a mangy moose in Algonquin Park and a beaver swimming in his pond near my cottage. Somehow, that's just not the same as capturing a cheetah eating its kill.

I make do with visits to the zoo and nature preserves. The beauty of these environments is that you can get up close to the animals and, with a suitable lens (e.g. 70-300 mm on an APSC-sensor camera), you can get some good shots. You can also pick your weather and lighting conditions and go back several times to make sure you get the photos you want.

Mouflon - Toronto Zoo


In contrast, a trip to Africa typically lasts 2-3 weeks, the animals are free to come and go as they please and you just might not encounter good weather and lighting conditions at the time your "prey" decides to appear at the watering hole.

One of my favourite places to photograph animals is the Haliburton Wolf Reserve near Algonquin Park in Ontario, Canada. There is a typical wolf pack kept in a 75 acre reserve that is very close to their natural habitat. The wolves are fed by humans, but the feeding schedule is kept fairly erratic so that the pack is not allowed to lock into a schedule. When the pack is hungry, the wolves hang out near the food source, conveniently located next door to the viewing gallery. The gallery has thick glass that reflects the people in the gallery, presenting a challenge to the photographer.

Alpha Male watches from the woods


The best time to photograph wolves is in the wintertime where the trees are devoid of leaves, affording a good view of any shy wolves who stay back in the trees.

Strictly from an ecological point of view, zoos and reserves are probably a good thing. A trip to Africa carries a pretty hefty carbon consumption with it. Far better for the environment to bring the animals to the crowds instead of the crowds to the animals. Of course, there are many that argue that animals kept in artificial environments are disadvantaged somehow, but I'm not sure that the animals know or care whether they live in Africa or a suburb of Toronto.

Lion Couple Resting their Eyes


From a photographer's point of view, it is certainly more challenging and exciting to capture animals in their natural habitat. In the case of birds, it requires a great deal of patience and preparation or dumb luck. However, it is certainly possible to capture excellent images of animals in captivity that convey the essence of the beast. I don't think photographers should be ashamed of stalking animals in zoos or reserves and the popularity of the various zoo lover groups on flickr attest to the enjoyment that people get from this passtime. However, it just doesn't seem the same as chasing wild game in a land rover and shooting animals living life in the wild.


Tuesday, May 1, 2007

Industrial Landscapes

It has been awhile. I've been going through a stressful time of changing jobs (again) and haven't been in the mood to write.

Things are starting to resolve, so here goes a new post:

My daughter has a Scottish boyfriend, Ben, who works at Poscor, Canada's second largest re-cycling company. Ben is an avid amateur photographer, although he is a misguided individual who prefers Nikon to Canon. I guess he just likes soft lenses :-)

Ben was kind enough to invite me to tour the Poscor site. Re-cycling companies have been photographed by some famous photogs, including Edward Burtynsky. If you visit his site, navigate to the urban mines section of his works to see photographs of Poscor. In fact, the one entitled Densified Scrap Metal 3a is hanging on the wall of the Poscor office boardroom.

The day we visited was rather overcast, but it was bright enough to get some nice light on the subject without the harsh glare of direct sunlight. We did a tour of the Poscor yards in a pick-up truck, stopping every now and then to see the big machines at work processing scrap metal.

Poscor is a scrap re-cycling exchange. The company finds sellers of scrap (e.g. junkyards, auto plants) and buyers of scrap (e.g. steel companies). If possible, it merely gathers scrap from the source and re-distributes it to the buyer, collecting a fee in the process. Sometimes, the buyer requires that the scrap metal be processed, usually by chopping it into smaller chunks. This is done using several different techniques, ranging from sophisticated mechanised methods to manual brute force.

The most interesting machine on the lot is the shredder. This behemoth takes flattened car bodies as its raw material and uses a spinning rotor with huge hammers to pound the car bodies into shrapnel. The small pieces are then separated into steel and non-steel, with the steel being shipped to a local mill for re-cycling.

Great photographers don't work by taking a quick trip around the lot in a pick-up truck, getting out occasionally to snap off a few shots like I did. I'm told that Burtynsky spends a week or so in a location scouting out subject matter and shooting angles, then waits for the light to be perfect for realizing his vision.

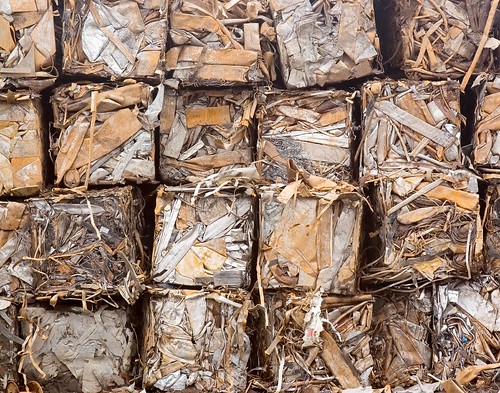
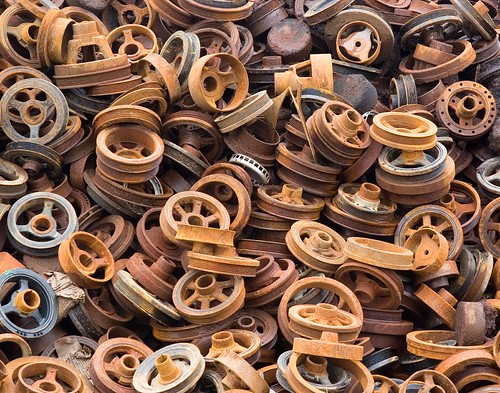
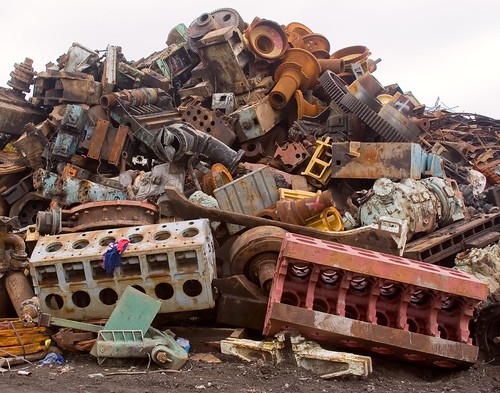
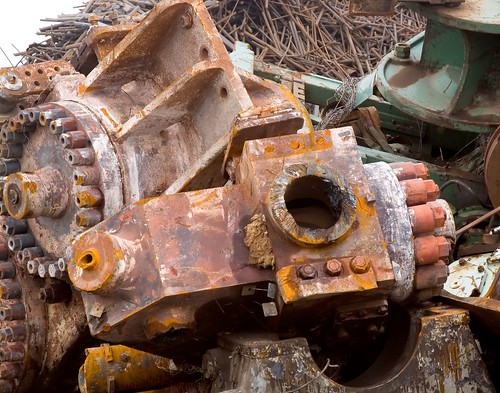
Nevertheless, I did get a half dozen shots that would pass for Burtynsky photos if you squinted from a distance and didn't look too carefully at the colour balance. Here is a selection:

Large Metal Bales


Assorted Sprockets


Mountain of Junk


Old Parts


Bales of Wire


The Gears


Thursday, March 22, 2007

Lightroom and Fashion Photography

This is a continuation of my last post, where I recounted my experiences as a newbee fashion photographer taking pictures of the beautiful models at the L'Oreal Fashion Week in Toronto in March.

When you take around 1,500 photos in two days and have to get them ready for web galleries overnight, a heavy duty tool is called for.

I've been using Lightroom 1.0 for a few weeks and watching the tutorials that I'd purchased from Luminous Landscape (see the LL tutorial site here). If you are not familiar with Luminous Landscape, it is a site created by Michael Reichmann, a Toronto-based photographer who has created a virtual industry around educating photographers through tutorials, a quarterly DVD and master class trips to exotic photogenic destinations like Antarctica.

Michael collaborates on the Lightroom tutorial with Jeff Schewe of Photoshopnews fame. The tutorials are terrific, with lots of tips and tricks balanced with photogeek repartee. Imagine two Santa Claus lookalikes exchanging photography humour and you get the picture.

My experience with Lightroom had been limited to processing my usual attempts at fine art photography and I'd discovered several things that endeared the product to me:
  • The database that underpins the Library module allows photographs to be categorized to the nth degree. Not only can you import photos following their original folder structure, but you can also assign them to collections (very much like Flickr sets). You can also create virtual copies of your photos and stack them. This is very useful if you want to have multiple crops of your pix. Best of all, there is only one master copy of the original raw file, so disk space is conserved. All editing changes are stored in the database as metadata.
  • The Development module is very easy to use. All the screen panels that contain information about the photo can be hidden so that the photo can occupy a lot of the real estate. The development controls for things like exposure, saturation, vibrance etc. are very intuitive and, given enough memory, seem to perform in real time.
  • Cropping is very intuitive. You can also easily touch up dust spots and blemishes.
  • For more advanced processing, it is very easy to undertake a round trip to Photoshop for things like noise reduction, local contrast and sharpening. Lightroom creates a copy of the image for Photoshop, passes any changes done to-date and stacks the resulting photo with the other versions of the photo.
  • Printing with Lightroom is very easy. You can create custom profiles for each type of paper and image placement.
All this was fine, but how would Lightroom support the processing of 1,500 photos as rapidly as possible?

This is where the software really shines. Here are some highlights of my experience:
  • It was very easy to set up Lightroom so that I could zip through all the photos using the arrow key to advance to the next image and the numeric key pad to assign a rating to each one.
  • After assigning a rating, I could filter the photos to select the 5 star versions and create a collection of selects.
  • I could further subdivide the selects into collections for each fashion show (each show had its own lighting characteristics that needed separate processing).
  • After building the collections, I was able to go through each photo and crop out extraneous stuff. I was shooting with a 24-105 lens and sometimes was unable to zoom in close enough to the models.
  • For each fashion show, I was able to edit the first photo and adjust white balance, exposure, brightness, contrast etc. I then selected all the photos in the collection and was able to synch my adjustments and apply them to the entire collection.
  • I then went through each photo to fine tune all the development settings.
  • Since these were going to be displayed in a gallery on the web, I exported each collection to a folder as JPEGS. I was able to specify the compression level and restrict the size of the exported photos so that they would fit in the gallery. All this was done as one batch operation.
All this went very rapidly and smoothly. The results were very good, especially considering my experience level.

In conclusion, if you are a working photographer with a need to process thousands of images in a short time, take a look at Lightroom. It has lots of features that make batch processing fairly easy. It also allows the flexibility to fine tune individual photos.

What would make Lightroom 1.0 even better? My wishlist would include a plug-in API like Photoshop's so that the Noise Ninjas of the world can be invoked without a round trip to Photoshop. It would also be nice if there was some way to increase local contrast. But, I was pleasantly surprised with the level of functionality in the 1.0 product and with the general stability of the product.


Monday, March 19, 2007

Famous Fashion Photographer for a Week

In my day job, I am the general manager of a local search site called toronto.com. One of our initiatives in 2007 is to establish our shopping channel as a viable part of our business, which has traditionally been strong in events, restaurants and movies. The fashion and beauty category is vital to attracting our target audience (young women with disposable income and an enjoyment of shopping as entertainment). For that reason, we decided to really focus on our coverage of the L'Oréal Fashion Week, an annual event that features lots of fashion shows and parties.

As the resident photo nut on staff, I managed to convince our shopping editor to get me a media pass so that I could join the pros in the photo bullpen at the end of the runway and play famous fashion photographer. 1,600 photos later, here's my report on what it was like to join the pros for a couple of very hectic evenings.

My initiation started on the Wednesday night. I was sharing photographic duties with our receptionist, a young woman saving to go to Europe for a year who is also an avid photographer. She had her initiation on Tuesday night and warned me about "George".

There were about 50 other photographers in the bullpen, an area at the end of the model runway consisting of two levels of risers and an area of floor. There was a distinct pecking order and a seemingly self-appointed King of the bullpen, a gentleman called George, a freelancer who had several photographers working for him at the shoot. George allocated the plum positions to the veteran media photographers and to his hirelings. However, the Fashion Television video camera got the top spot, presumably because of its importance as a worldwide promotion vehicle for the sport of fashion shows.

As a newby, I had a choice of two positions. I could either sprawl on the hard, concrete floor or I could stand on the edge of the floor, just inside the tape that separated the photo geeks from the beautiful people. I chose the latter because at my age, I just can't sit on a concrete floor for any length of time. This turned out to be a fortuitous choice.

Prior to my assignment, I'd read an interview with the top fashion runway photographer in New York, Dan Lecca and he claimed that the top spot was at the end of the runway, slightly off-centre, with a long-range lens.

It just so happened that there always seemed to be a spot for me right beside the Fashion Television videographer, who also seemed to favour a slightly off-centre position. This also proved to be highly fortuitous because the models always seemed to seek out the FT camera and mug for it. I managed to get a lot of shots of models posing so that they appeared to be looking right at me, but were really looking just to my left.

The trickiest part of the shoot proved to be the lighting. I don't own an F2.8 lens, so I brought along my 70-300 mm Canon DO lens because it has a very useful zoom lens and excellent IS. I figured that I could use it wide open at f4.5 and trust the IS to steady the lens at shutter speeds of 1/100 or less.

The pros were pretty evenly split between Canon and Nikon and were using the usual D200's and 1Ds's. Nearly everyone had an f2.8 70-200 mm zoom. As you can imagine, I had a bit of camera envy. A monopod was essential, especially for owners of these heavyweight cameras and lenses. With my 20D and compact zoom lens, I was able to get away with handholding, but I wouldn't recommend it.

My Canon lens proved to be a bit of a problem on the first night. IS is terrific when the models are standing still (e.g. at the end of the runway), but slow shutter speeds are not much use when the models are walking towards you. f2.8 coupled with a higher shutter speed (e.g. 1/250) would have been ideal. In addition, anyone who has used this lens will testify that the zoom ring is really, really stiff. I got tired of wrestling with it after the first night. My slightly off-centre location also made it impossible to see very far down the runway, so it was really pointless to have a long zoom. Most of my photos were taken in the 70-100 range, so I decided to bring my 24-105 lens on the Thursday night.

I noticed that quite a few of the pros had their Macbook Pros with them and were spending the half hour between shows editing their photos so that they could file their selects quickly. I admired their time management skills and wished that I'd had the foresight to pack my laptop. At 1 in the morning, I was still processing my photos from the day's shoot.

The lighting was a big challenge on several fronts. George, the pit boss, had been very firm in telling everyone that using a flash was OUT. I could understand that - no one wants their shot to be spoiled by someone else's flash ruining their exposure. However, shooting in ambient light was not for the faint of heart. The light varied from show to show, depending on the artistic whim of the designer. Some shows had all-out bright lighting, while others tried to set in intimate or edgy mood and relied on a couple of wandering spots. At first, I tried shutter priority, setting the shutter speed to 1/100 using a high ISO (800). The things you learn about your equipment when you're on a new kind of shoot! Who knew that the camera treated shutter priority as a guideline and started to reduce it when it couldn't open the aperture any further? My shutter speeds were dropping to 1/30th or even 1/15th and I could see that my photos were pretty blurry at times.

I tried aperture priority at an even higher ISO to get a better depth of field and reduce the chance of a mis-focus, but the shutter speeds varied all over the map, depending on reflections from the clothing.

Finally, I settled on putting the camera in manual mode, dialling in an f-stop of 5.6 or 6.3 to get some lens sharpness and depth of field and combining that with a shutter speed of around 1/80th of a second to stop as much of the action as possible. Depending on the amount of light in the show, I shot at either ISO 800 or 1600. This seemed to work tolerably well and I got a good percentage of in-focus shots and a decent exposure level.

The next choice was an easy one. Was I going to shoot in raw mode or JPEG? I had a 4 GB card with me and figured that approx. 500 raw shots wouldn't cut it, so I chose JPEG. I also need to do some rapid shots in succession to capture action shots of the models, so JPEG also suited that application.

As I was settling in for the first show, a woman next to me, obviously a pro, asked me what I thought the white balance setting was. Yikes! I was so used to shooting raw that I'd never had to worry about setting white balance. I could always adjust it after the fact. I had to admit that I had no idea what the white balance was and suggested that she ask the Fashion TV guy who seemed pretty nice considering his exalted position as top of the pro heap. I didn't admit to her that I wasn't sure how to even set the white balance in my camera. I let the camera set the WB automatically and hoped for the best. As it turned out, I could adjust the WB on my computer using Adobe Lightroom despite selecting JPEGs - the control seems to work just the same. It was a good thing too - my auto white balance setting proved to be too warm and the clothing had a yellowish cast.

My two evenings of pretending to be a famous fashion photographer went by in a blur. I couldn't tell you the first thing about what I was shooting, but I gradually got better at my craft. By the end of the second night, my exposure was pretty darned good, the blurry shots were fairly rare and I managed to get in a routine of capturing two action shots and one close-up of every model. The Canon 24-105 L lens proved to be much easier to operate than the stiff 70-300 DO lens and allowed me to quickly zoom in and out to get the shots I wanted. The zoom range was perfect for my angle of view. The D20 proved to be reliable and terrific from an ergonomic point of view. I was able to keep the exposure within hailing distance of ideal by fine tuning the shutter speed and aperture using the thumbwheel and finger wheel.

In my next post, I'll talk about my experience with using Adobe Lightroom to process well over a thousand photos in a very short amount of time.

Here are a couple of the photos from the shoot. Notice how they are posing for the FT camera.


Saturday, March 10, 2007

Photographs of Ships

One of my recent projects is to take photos of ships in the Toronto harbour. The seasons come and go, but the lake freighters sail on. A few winter in the harbour, locked in by the ice, but inevitably the thaw comes and they move on to other ports.

I was cruising around the web looking for pointers on photographing the big lakers. I've managed to capture a couple of decent photos of the beasts, but haven't really got a full understanding of what works yet.

I stumbled on a couple of astounding sites. Who knew that each and every one of the great lake ships has been catalogued and photographed many times? And who knew that such talented photographers had dedicated their lives to travelling the great lakes, taking pictures of these behemoths?

One story that captured my imagination was the bittersweet tale of Ray Thorsteinson. Ray grew up in Thorold, right next to the Welland Canal and was enamored with the lakers from an early age. He spent most of his adult life on the west coast and was fond of taking photographs of ships in Puget Sound. He pursued his hobby during his working life and was looking forward to a retirement where he could devote more time to it. Unfortunately, his life came to an early close as he fell overboard while on one of his ship photography adventures in his small boat.

Here's a Thorsteinson photo that I just love. It was taken from the Golden Gate bridge and the sense of motion and majesty is wonderful.


My exploration of Ray's site led me to the Welland Canal site, a treasure trove of photographs curated by marine photographer Jeff Cameron. You could spend a month exploring this site. One evening, I discovered a ship on the site that I'd actually spotted several weeks beforehand. While returning from a photo assignment to capture images of a large salty loading a cargo of wheat, I had to stop for the lift bridge in Burlington and the vessel that sailed past me was called the Cuyahoga. Little did I know that I was looking at a historically significant vessel. This venerable ship had started its life in 1943 as the Mesabi and is one of the oldest commercial vessels still in use on the great lakes.

I still haven't discovered the magic formula for photographing lakers, but I have a new appreciation for a hobby that I share with many artists, nearly all much more dedicated than I.